Local, single-user, linear workflow#
Directed Acyclic Graphs (DAG)#
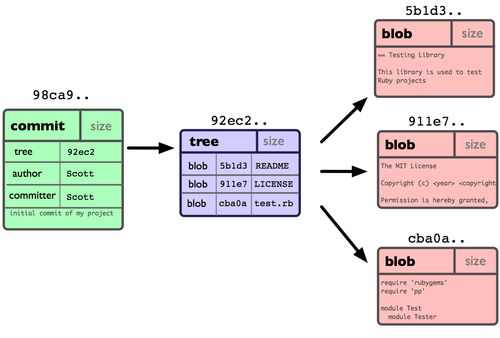
The fundamental unit of information in git is what is called a commit. A commit is a snapshot of a work at a point in time. Now, for version control systems we don’t want to have just one snapshot of our work, but instead we want many of them. Furthermore, instead of a linear sequence of snapshots we may imagine having multiple lines or branches of snapshots including different versions of our project. These commits are then organized in a directed acyclic graph, as the one shown in the following picture.
Credit: ProGit book, by Scott Chacon, CC License.
We identify each node (commit) with a hash, a fingerprint of the content of each commit and its parent. It is important the fact that the hash include information of the parent node, since this allow us to keep the check the structural consistency of the DAG.
Let’s create a first hash:
from hashlib import sha1

# Our first commit
data1 = b'This is the start of my paper.'
meta1 = b'date: 1/1/17'
hash1 = sha1(data1 + meta1).hexdigest( )
print('Hash:', hash1)
Hash: 3b32905baabd5ff22b3832c892078f78f5e5bd3b
Every small change we make on the previous text with result in a full change of the associated hash code. Notice also how in the next hash we have included the information of the parent node.
data2 = b'Some more text in my paper...'
meta2 = b'date: 1/2/1'
# Note we add the parent hash here!
hash2 = sha1(data2 + meta2 + hash1.encode()).hexdigest()
print('Hash:', hash2)
Hash: 1c12d2aad51d5fc33e5b83a03b8787dfadde92a4
Locals#
Type git to see a full list of all the core commands. We’ll now go through most of these via small practical exercises:
!git
usage: git [-v | --version] [-h | --help] [-C <path>] [-c <name>=<value>]
           [--exec-path[=<path>]] [--html-path] [--man-path] [--info-path]
           [-p | --paginate | -P | --no-pager] [--no-replace-objects] [--bare]
           [--git-dir=<path>] [--work-tree=<path>] [--namespace=<name>]
           [--super-prefix=<path>] [--config-env=<name>=<envvar>]
           <command> [<args>]

These are common Git commands used in various situations:

start a working area (see also: git help tutorial)
   clone     Clone a repository into a new directory
   init      Create an empty Git repository or reinitialize an existing one

work on the current change (see also: git help everyday)
   add       Add file contents to the index
   mv        Move or rename a file, a directory, or a symlink
   restore   Restore working tree files
   rm        Remove files from the working tree and from the index

examine the history and state (see also: git help revisions)
   bisect    Use binary search to find the commit that introduced a bug
   diff      Show changes between commits, commit and working tree, etc
   grep      Print lines matching a pattern
   log       Show commit logs
   show      Show various types of objects
   status    Show the working tree status

grow, mark and tweak your common history
   branch    List, create, or delete branches
   commit    Record changes to the repository
   merge     Join two or more development histories together
   rebase    Reapply commits on top of another base tip
   reset     Reset current HEAD to the specified state
   switch    Switch branches
   tag       Create, list, delete or verify a tag object signed with GPG

collaborate (see also: git help workflows)
   fetch     Download objects and refs from another repository
   pull      Fetch from and integrate with another repository or a local branch
   push      Update remote refs along with associated objects

'git help -a' and 'git help -g' list available subcommands and some
concept guides. See 'git help <command>' or 'git help <concept>'
to read about a specific subcommand or concept.
See 'git help git' for an overview of the system.
Tip
You can execute commands in bash from a Jupyter notebook by adding the ! in front. You can also add the magic %%bash at the top of the cell to indicate that all the code in the cell must be executed in the shell.
Warning
If well you can do most of the following git operations from a notebook, we actually recommend you to execute this commands directly from the shell.
First we create an empty folder and then we initialize it as a git repository. From your terminal, run
git init test
Let’s see what git just did. Move inside to this folder and use the listing function to show all the files and directories inside the test repository test:
cd test
ls -la
Note
What makes test a repository? If you pay attention to what is inside the folder, you will see an especial folder called .git. Here is where all the information that git is using to version control your files belongs. If you delete this folder, then your repository will pass to be a simple folder with no version control capabilities.
Now let’s edit our first file in the test directory with a text editor. We can also create a new text file with the next command.
echo "My first bit of text" > file1.txt
The first step we have to do in order to version control this new file, we need to add it
git add file1.txt
We can now ask git about what happened with status:
git status
The next step is to commit our changes to permanently record our changes in git’s database. For now, we are always going to call git commit either with the -a option or with specific filenames (git commit file1 file2...). This delays the discussion of an aspect of git called the index (often referred to also as the staging area) that we will cover later. Most everyday work in regular scientific practice doesn’t require understanding the extra moving parts that the index involves, so on a first round we’ll bypass it. Later on we will discuss how to use it to achieve more fine-grained control of what and how git records our actions.
git commit -a -m"This is our first commit"
In the commit above, we used the -m flag to specify a message at the command line. If we don’t do that, git will open the editor we specified in our configuration above and require that we enter a message. By default, git refuses to record changes that don’t have a message to go along with them (though you can obviously ‘cheat’ by using an empty or meaningless string: git only tries to facilitate best practices, it’s not your nanny).
Tip
You can use git log to see what has been commited so far
git log
Sometimes it’s handy to see a very summarized version of the log:
git log --oneline --topo-order --graph
Git supports aliases: new names given to command combinations. Let’s make this handy shortlog an alias, so we only have to type git slog and see this compact log:
git config --global alias.slog "log --oneline --topo-order --graph"
and now we can use this new alias to print a short version of the commit history
git slog
Let’s do a little bit more work… Again, in practice you’ll be editing the files by hand, here we do it via shell commands for the sake of automation (and therefore the reproducibility of this tutorial!)
echo "And now some more text..." >> file1.txt
And now we ask git what is different
git diff
The format of the output above is well explained in detail in this Stack Overflow post. But we can provide a brief summary here:
diff --git a/file1.txt b/file1.txt
This tells us which files changed overall, with ‘a’ representing the old path and ‘b’ the new one (in this case it’s the same file, though if a file had been renamed it would be different).
index ce645c7..4baa979 100644
These are hashes of the file at the two stages, needed by git itself for other operations with the diff output.
The next block shows the actual changes. The first two lines show which paths are being compared (in this case the same file, file1.txt):
--- a/file1.txt
+++ b/file1.txt
The next line indicates where the changes happened. The format is @@ from-file-range to-file-range @@, where there’s one more @ character than there’s parents to the file comparison (git can handle multi-way diff/merges), adn the file range format is -/+<start line>,<# of lines>, with - for the from-file and + for the to-file:
@@ -1 +1,2 @@
Lines prepended with - correspond to deletions (none in this case), and lines with + to additions. A few lines around deletions/additions are shown for context:
 My first bit of text
+And now some more text...
And for now on, the circle of virtue just repeats: work, commit, work, commit
git commit -a -m"I have made great progress on this critical matter."
While git add is used to add files to the list git tracks, we must also tell it if we want their names to change or for it to stop tracking them. In familiar Unix fashion, the mv and rm git commands do precisely this:
git mv file1.txt file-newname.txt
git status
Note that these changes must be committed too, to become permanent! In git’s world, until something hasn’t been committed, it isn’t permanently recorded anywhere.
Apendix#
These is the sequence of all bash commands we have use in this tutorial in the right order.
git init test
...
...
...